Customising tables
In brief
Many pages in Exaprojects feature tables. These tables can be customised in a variety of ways to suit your preferences. You can resize, move and hide or show columns as well as search and order the data by individual columns. Any updates you make the to the table's layout will be saved by Exaprojects and restored when you next visit the page.
In the below guide we'll be demonstrating the column features via the Users page table. Please note that the same principles apply to all tables across Exaprojects, however.
Scrolling the table#
Dependent on your screen size and the amount of data and number of columns visible in your table, there may be horizontal and vertical scrollbars. You can click and hold the dark grey part of the scrollbar to scroll left and right or up and down the table. Alternatively, click the lighter grey area to jump the scroll ahead.
You can also use your mouse-wheel and trackpad to quickly scroll vertically and horizontally.
Also note that many tables can be scrolled using the keypad. If you select a cell and it has a blue border, you can use your keyboard's arrow keys to navigate the table. Furthermore, if the cell has a dashed blue border, this means it is editable and you can press the enter key (or long press on mobile) to edit it.
Resizing columns#
By hovering over the edge of a column in the title row, you'll notice your cursor changes to a resize icon and a grey, vertical bar appears.
![]()
If you then click, hold and drag to the right or left, this will resize the column.
Note, you can reset column widths to 'best-fit' which is automatically calculated by Exaprojects based on the data in the table. You can do this by clicking the 'Columns' button and selecting 'Reset columns' - this button is explained more below.
Moving columns#
By clicking and holding the column title and then dragging it to the left or right, you can change the column order.
Hiding or showing columns#
Every table will feature a 'Columns' button above it, generally located to the right.

If this button is clicked, a dropdown appears which provides a list of the columns available within the table. A green tick by the column name means that column is currently shown.
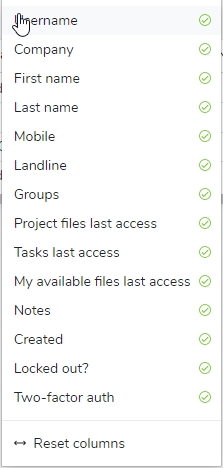
If the column names are then clicked, that will hide or show the column.
Good to know
Your table customisations will be saved by Exaprojects and restored the next time your visit the table.
Searching the entire table#
If you wish to search the entire table, you can use the search box, which is usually available above the table to the right.

Entering text into this search box will search every applicable column. To clear your search, simply clear the text from the search box.
Searching individual columns#
If you hover over a column title, you'll notice a magnifying glass appears to the right.
![]()
If you then click the magnifying glass, you'll be able to search that individual column's data. To clear the search, simply click the 'x' button that appears.
Please note that not all columns can be searched in this manner. Look out for the magnifying glass when you hover over the column title. If it doesn't appear, the column can't be searched.
Ordering columns#
Similar to the above, if you hover over a column title, you'll notice an up-down chevron icon appears by the column name.
![]()
If you then click it, this will sort the table by the column in alphabetical order. If you click it again, it will order reverse alphabetically. Additionally, if you click a column containing numerical data, it will sort biggest to smallest or vice versa on click again.
As above, not all columns can be ordered in this manner. Look out for the up-down chevron icon when you hover over the column title. If it doesn't appear, the column can't be ordered.
Editing table data#
Many of Exaprojects tables allow inline editing - i.e. you can directly edit the data within the table. An editable cell with have a dashed blue border around it if you single click it.
In the Users table, for example, the Company, First name, Last name, Mobile etc. columns are all editable. To edit cell data, simply double click the cell. Alternatively, if you have selected the cell and it has the dashed blue border, press enter. You can then make the necessary updates and click 'Update'. The table will then update with your edited data.